Customer Support
Welcome to our online support center. Here you can find answers to the most commonly asked support questions along with how-to videos to get you started. If you are still having trouble, please contact customer support for additional conferencing help.
It's just 2 easy steps:
- Send an email to your meeting attendees with the date/time of your meeting. Include the dial in number(s) and the Participant PIN. If you plan to use video or share your screen, also include your meeting room link.
- When it's time to start your meeting:
- For audio only meetings: call your dial-in number and enter your Host PIN.
- For video and web meetings: login in to your meeting room by going to My Account and enter your User Name and Password, and click on Start Now. Instruct your meeting attendees to click on the meeting room link you sent them.
That’s it – your meeting is underway!
- From the dashboard, click ‘Schedule Conference’ which will launch the Schedule Conference wizard.
- Step 1 – Schedule a Conference
- Pick a date, time and duration.
- Specify a conference name (optional).
- Select if you want it to be a recurring conference.
- Choose the type of conference and the Dial In option.
- Choose if you want the system to conveniently dial out to you at the time of the conference.
- Step 2 – Conference Details
- This shows you the summary of your conference. You can copy this information to the clipboard and use it to manually send out invitations and/or click ‘Add Attendees’ to use the system to send out invitations for you.
- Step 3 – Attendees
- Here you can manually enter attendee information or select them from your contacts.
- Step 4 – Email Invitations
- You are presented with an invitation email which you can make changes to before sending to your conference attendees.
- You can also choose to send reminder emails before your conference.
- Step 5 – Add to calendar
- Finally, you can optionally add the conference to your calendar.
Participants can dial in to your conference calls from anywhere in the world at no additional charge to you. Simply provide them with the toll dial in number provided to you at signup. Participants will be charged by their local phone service provider for any long distance fees for calling to the United States.
Alternatively you can provide a toll free dial in number to your participants outside the United States. Participants incur no cost to use these numbers, however there is a surcharge to you, as indicated.
To view the list of International Dial In Numbers along with their surcharges, go to the Dashboard and click on 'Int'l Dial In Numbers' under 'My Meeting Room Information'.
After you start your conference call, there are two ways you can have the system call someone to join your meeting:
- Log in to your online account, then:
- From the Home page select Start Now.
- On the next page click on the flashing green phone icon to take you into the conference manager where you can see everyone who is currently on your call.
- Click on the Invite Participant icon and choose Dial Out
- Enter the phone number(s) of the person(s) you want to add to your conference.
- Click on the Invite button and the system will call your participants and ask them to join your call. They will not need the Participant PIN in order to join.
OR
- Press *1 on your telephone’s keypad. Follow the prompts to enter the phone number of the person you want to call and bring them into your meeting.
- If you want to start a conference call right away, Log in to your online account, then:
- From the Home page select Start Now.
- On the next page, under Step 2, you will see the option to have the system call you at the number shown. You can edit the number if needed, then click Dial.
- They system will call you and ask you to join the conference.
- For conference calls in the future, and for recurring conference calls, you can use the Schedule feature. Log in to your online account, then:
- From the Home Page select Schedule
- On the next page, enter the details of your scheduled conference call
- Select the check box next to “Have the system dial out to me at the time of the conference” and if necessary edit the phone number shown.
- If this will be a recurring conference call, select the check box next to “Repeat” and enter the recurring details.
- Click on the Save and Continue button. You can then either add attendees that you want to invite (via email) or click Done.
- At the scheduled time of your conference call, the system will call you and ask you to join the call.
-
Log in to your online account and in the Admin menu select Greeting. You can choose to record your own greeting over the phone, upload a recording of your greeting (must be a .wav file), or have a professional voice actor record your greeting (additional costs may apply).
Greetings recorded over the phone will be available immediately. Uploaded or professionally recorded greetings will take a day or two to become available.
You will be assigned new dial in numbers to use with your custom greeting. Be sure to distribute your new numbers to your conference participants.
Host Controls
- *0 - Help Message
- *1 - Dial out to add a participant to the conference
- *2 - Change conference entry and exit options (name announce, tone, or silence)
- *3 - Enables/disables continuation of conference after host exits
- *5 - Lecture Mode (mutes all participants except the host)
- *6 - Self-Mute
- *7 - Security (locks conference so no additional participants can join)
- *8 - Play list of participants' names
- #8 - Count of participants
- *9 - Start Recording
Participant Controls
- *0 - Help Message
- *6 - Self-Mute
Your account is initially configured to announce the name of each participant as they enter and leave the conference.
You can change this to hear either a tone or silence:
- To change this setting during a conference, press *2 or select the Entry/Exit option in the conference manager toolbar.
- To make this change permanent, go to My Profile -> Meeting Room Settings and set the option you want for Entry/Exit Announcement.
Simply press *6 on your phone. To unmute, press *6 again.
You can also mute by selecting the mute icon next to your name in the conference manager.
You can ask the participant to enter *6 on his phone, which will mute his line.
You can also mute the participant by selecting the mute icon next to their name in the conference manager.
Alternatively, as the host on a conference, you can mute all participants (except yourself) by pressing *5. You can then inform the participants that they can press *6 to unmute themselves when they want to talk.
The host can begin recording a conference at any time by pressing *9 on his phone. To stop the recording, press *9 again.
You can also start and stop recording by clicking the record button in the conference manager.
All plans include both a toll and toll-free dial-in number. You can give either number to your conference participants to use to dial in to your conferences. When participants call in using your toll dial-in number there is no charge to you – all plans include unlimited minutes for toll dial-in. When participants call in using your toll-free dial-in number, you will be charged the toll-free dial in rate as shown with your rate plan. The rate is per minute per participant who dials in using the toll-free number.
You can use both the toll and toll-free dial in numbers on the same conference call. That is, you can give some participants the toll dial in number and others the toll-free dial in number.
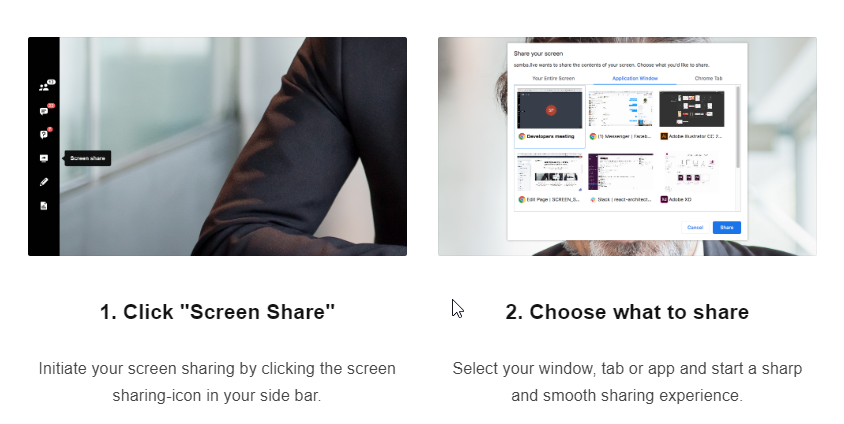
- Send an email to your meeting attendees with the date/time of your meeting. Include your meeting room link. Your meeting room link is shown in your Welcome Email as well as on the Home page of My Account.
- When it's time to start your meeting login in to your meeting room by going to My Account and enter your User Name and Password, and click on Start Now. Instruct your meeting attendees to click on the meeting room link you sent them.
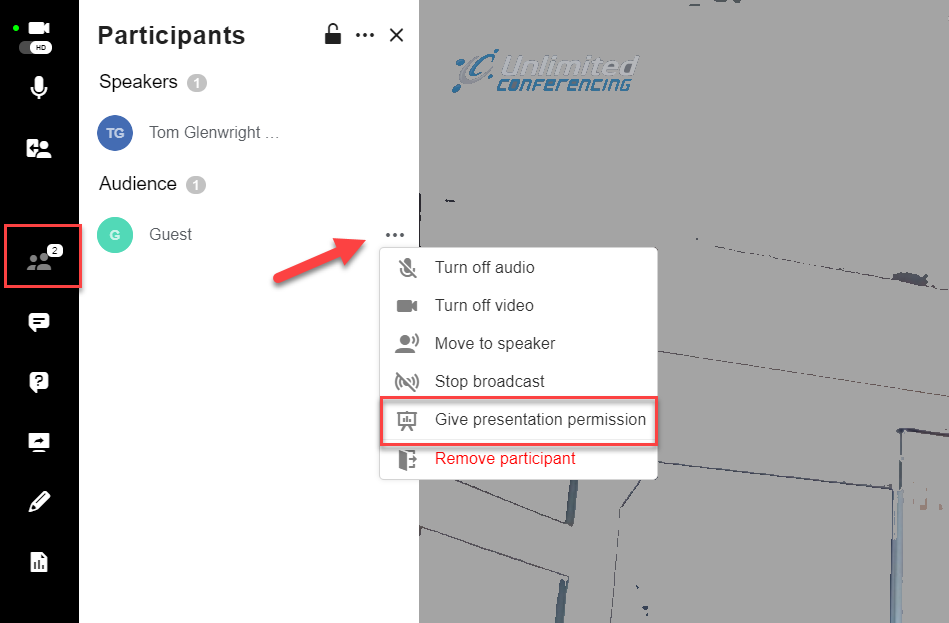
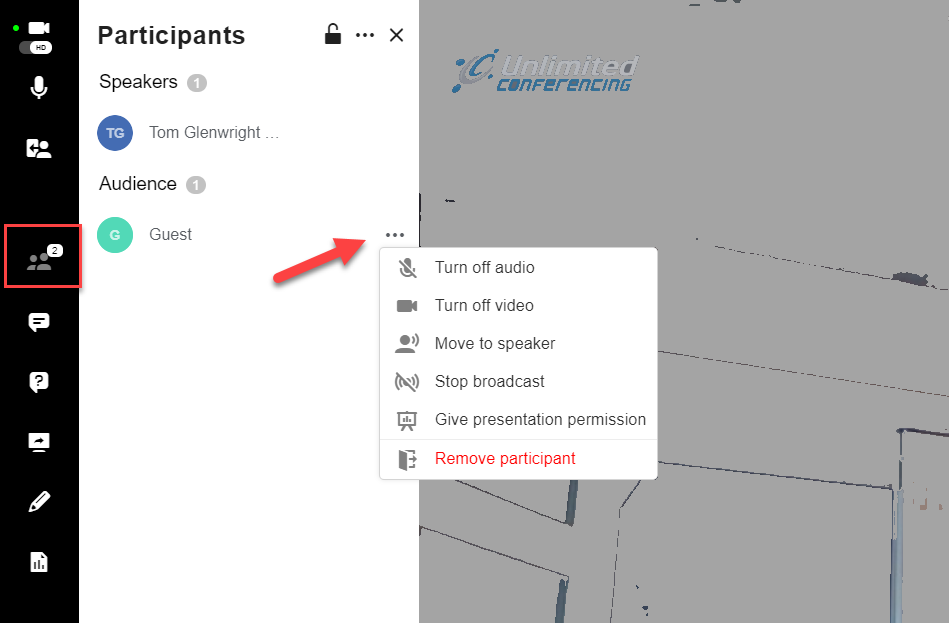
Open the Participants list and click on the ellipses (…) next to the participant you want to give permission to share their screen. Then select “Give presentation permission”.
The list of supported systems is below.
Windows- Microsoft® Windows 10®
- Microsoft® Windows 8.x®
- Microsoft® Windows 7® SP1
- Chrome v50 or higher (recommended for best performance)
- Firefox 49.x or higher
- Mac OS X v10.8 or higher
- Chrome v50 or higher (recommended for best performance)
- Safari 12.1 or higher
- Firefox 49.x or higher
- Red hat® enterprise linux (RHEL) 5
- Novell SUSE® 9.x or higher
- Ubuntu 10 or later
- Chrome v50 or higher (recommended for best performance)
- Firefox 49.x or higher
- Solaris 10
- Chrome v50 or higher (recommended for best performance)
- Firefox 49.x or higher
Android
- Chrome
- Safari
- Click on the Account Settings menu (the cog icon)
- Click on Invoices
From here you can view/print copies of all of your previous invoices, their corresponding receipts and corresponding usage reports.
- Click on the Account Settings menu (the cog icon)
- Click on Reports
- Select the report parameters you want
- Click the Refresh button
To upgrade, click the button below
Each Host has their own set of PINs. To add additional hosts:
- Click on the Account Settings menu (the cog icon)
- Click on Users
- Click on Add Host Licenses
Yes, you can easily change your PIN codes as often as you like.
- Click on the Account Settings menu (the cog icon)
- Click on Users
- Click on Change PINs next to the user pins you want to change
Please note that once you change your PINs, you cannot go back to the original PINs.
- Click on the Account Settings menu (the cog icon)
- Click on Billing
- Click on the Update Credit Card button